


Windows users face a plethora of problems in the OS, and one of the most common ones is the Windows 10 high RAM usage problem, due to which the PC/Laptop becomes painfully slow to use. Hence, if you’re facing the same problem and if the slowness caused due to it makes you feel like smashing your computer’s screen, In this article, let’s look at some of the fixes for this issue.
Here are the things that we’ll be covering in this article.
- What causes this problem
- How to identify the problem
- Solutions to the problem with step-by-step troubleshooting
What Is The Windows 10 High Usage Problem
If you didn’t guess by the name already, Windows 10 high usage problems are caused due to the operating system or its components using up all the RAM. This problem slows down the PC and restricts you from carrying out tasks on the same.
What Happens Due To The Windows 10 High RAM Usage Problem
Some of the symptoms of the Windows 10 high RAM usage problem are:
- Applications not responding/crashing
- Apps opening slow and sluggish computer performance
- Unable to download or update applications or the OS itself
Solutions For Windows 10 High RAM Usage Problem
Disable Startup Applications
Disabling startup applications is, hands down, one of the easiest ways to fix the Windows 10 high RAM usage problem. For starters, startup apps are the apps that start automatically as soon as you boot into Windows. But why does it cause issues?
You see, when you boot into the OS, the CPU is already running extensively to cope up with the resource requirements of the OS. A straightforward analogy to understand this would be; if a person has just completed a marathon, you can’t and probably shouldn’t tell him/her to do another tedious task as he’s already a lot tired.
Hence, startup apps may be enabled and are running in the background, hogging all the system resources. To disable them
1. Click on the Start menu icon at the bottom-left corner of your screen and start typing “startup” until you see the first search option called “startup apps.”

2. In the new settings window that appears, you’ll see the apps that run on startup. Toggle off the apps that you don’t use a lot and those you don’t want to run on startup.
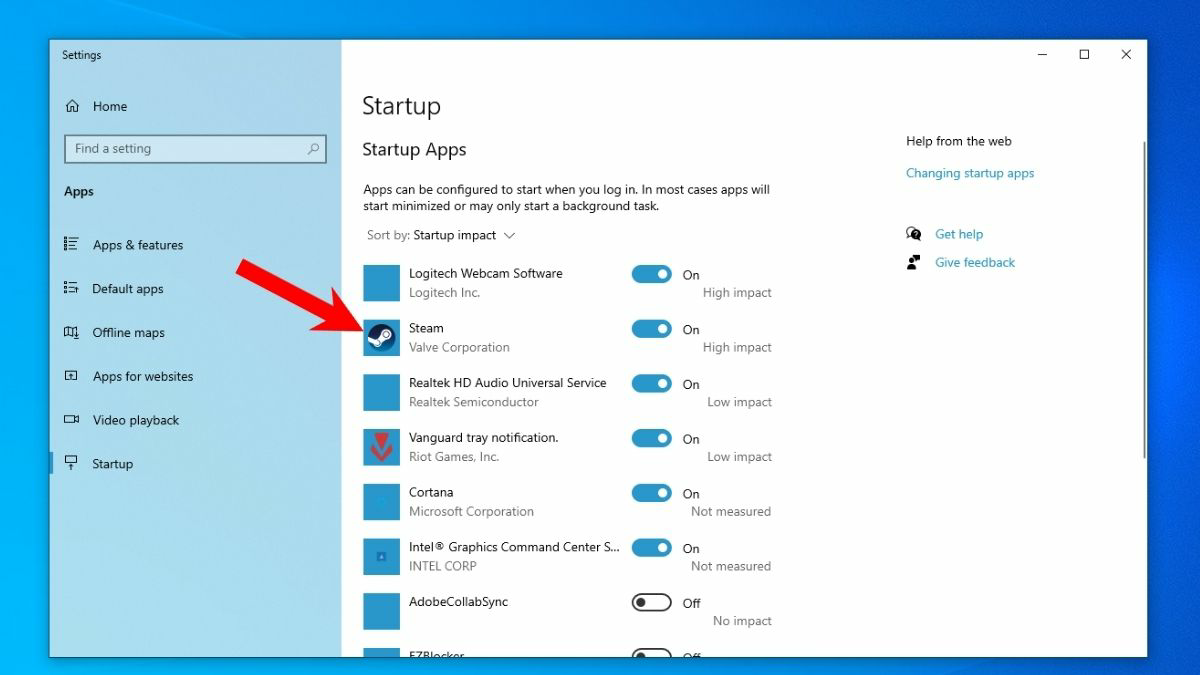
3. After you’re done doing it, restart your computer. Startup apps are the root cause of the Windows 10 high RAM usage problem, and disabling them helped many users face the issue.
If the problem persists, don’t worry. Move on to the next fix, which is.
Defragment Hard Drive And Enable Performance Mode
Defragmenting is one of the essential things on a laptop that most people don’t do. For starters, as the name suggests, think of defragmentation as picking up and arranging your important stuff in one place so that you can access everything easily versus scattering things across the room, due to which searching for a particular item will take a lot of time.
The built-in disk defragmenter collects the fragmented data scattered at multiple places in the hard drive and arranges them (defragments) in one place so that the data can be read easily and quickly.
Sometimes Windows 10 100% disk usage problems could also be the reason for lags and hiccups in the OS. Therefore, you will need to defragment the hard drive so that the data access becomes quicker, thereby increasing the overall performance. To defragment your hard drive.
1. Click on the Start menu button on the bottom-left corner and start typing “defragment” until you see the first option that reads “Defragment and Optimize Drives.” Click on it.
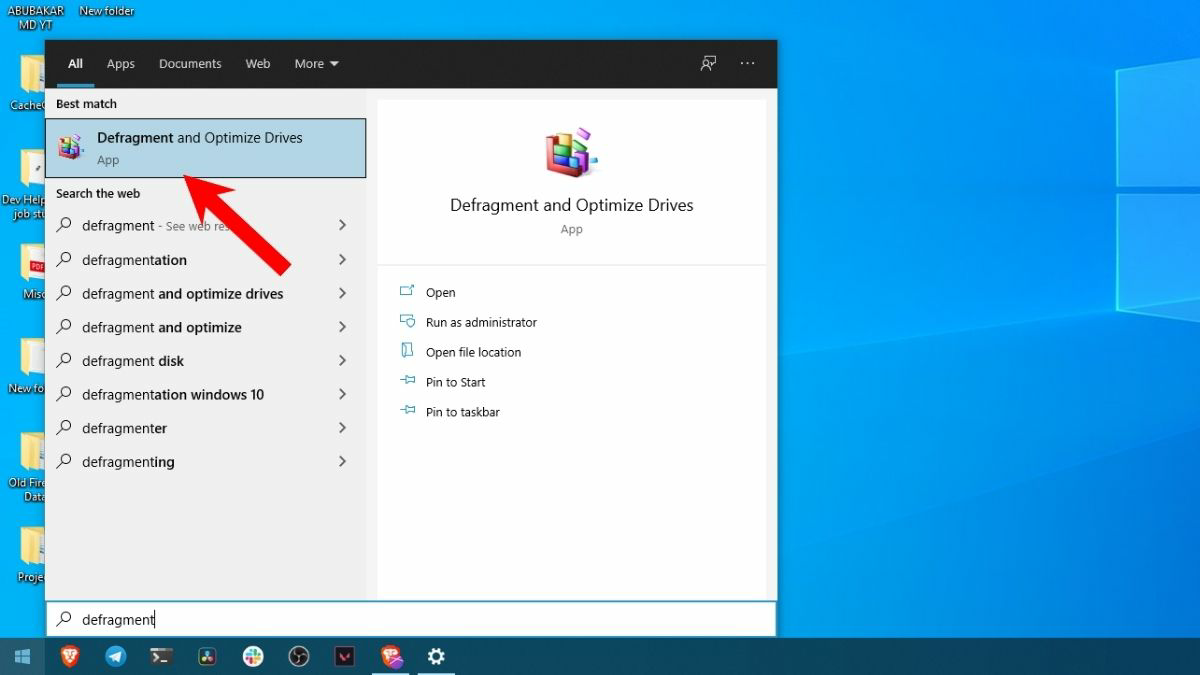
2. You’ll see a list of all the hard drive partitions. Click on each partition, and finally, click on the Optimize button.

Depending on the data stored, the size, and the drive’s speed, this process might take several minutes to even hours to complete. You can proceed with your work while the defragmentation’s running in the background.
Enable Performance Mode
In the system properties, the performance setting is set to “Let Windows choose what’s best for my computer.” Changing it to “Adjust for best performance” should help solve the Windows 10 high RAM usage issue. To enable the performance mode, all you need to do is.
1. Click on the Start menu button on the bottom-left corner and start typing “This” until you see the first option that reads “This PC.”
2. From the options you see on the right side of the search results, find and click on properties.
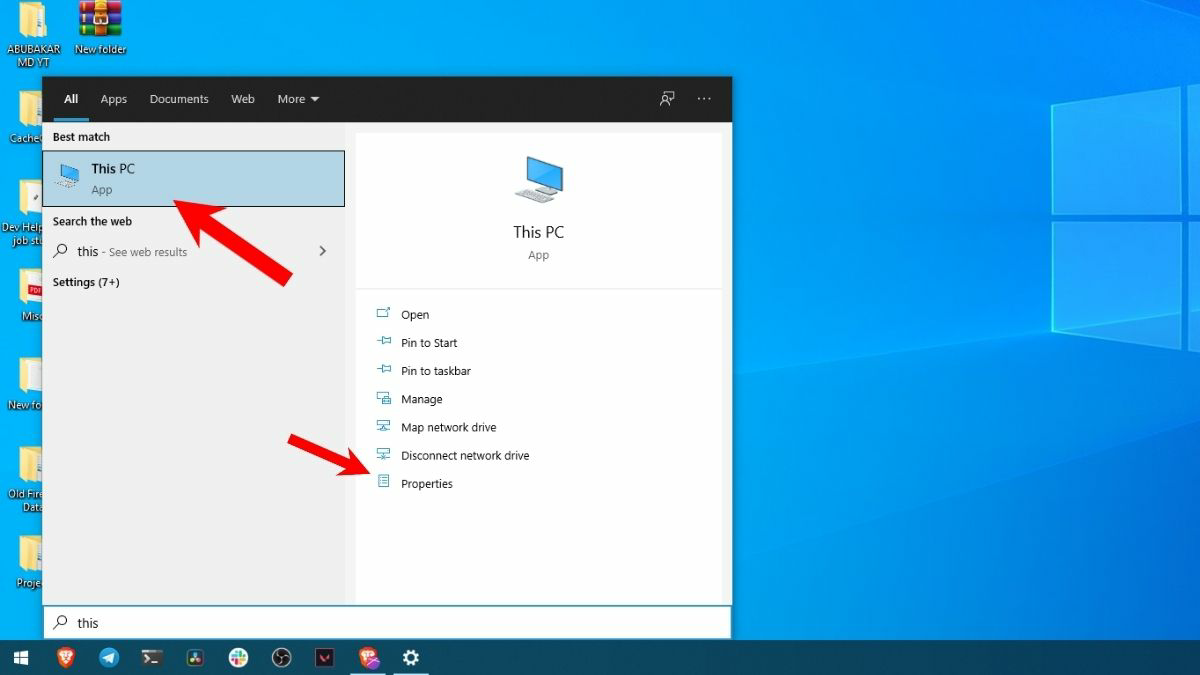
3. In the settings window that appears, on the right side, find and click on the Advanced system settings option.
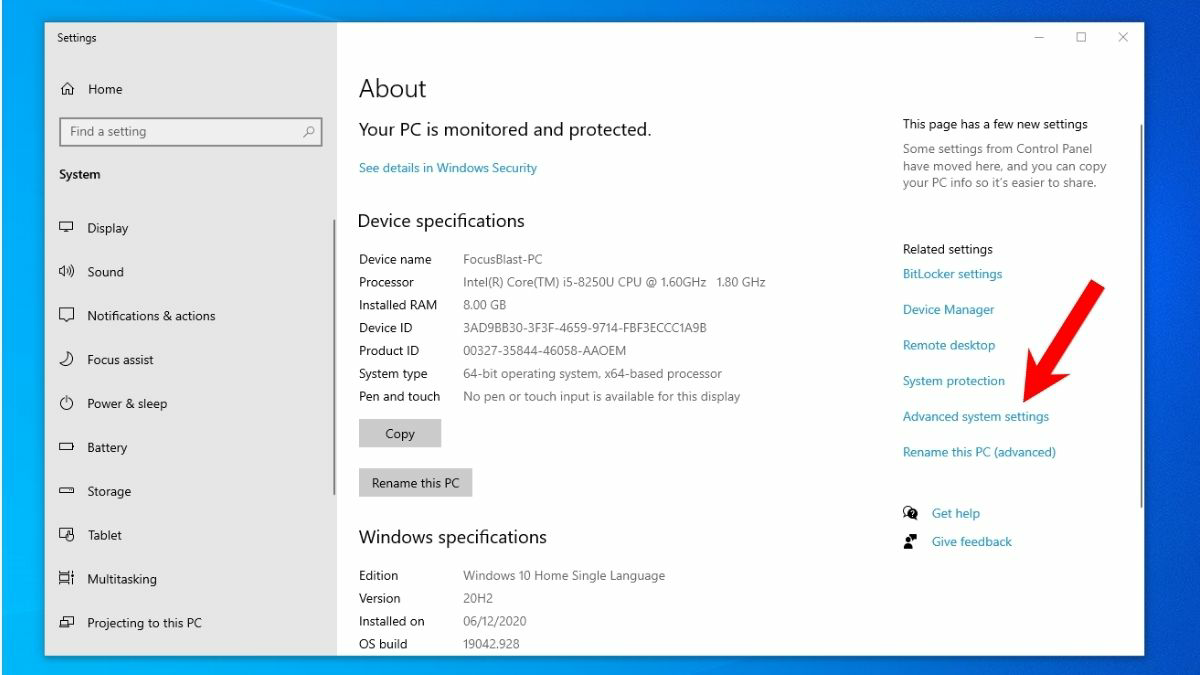
4. In the new window that appears, in the performance section, click on settings.

5. Finally, click on Adjust for the best performance radio button, click on Apply, and click on OK.
Change The Registry Values
This method frees up some of the virtual memory by deleting pages in the storage drive. For starters, think of pages as the pages of a notebook from which you can erase all the unwanted notes to free up space for other notes. Changing the registry values is pretty straightforward.
1. Click on the Start menu button on the bottom-left corner and start typing “Reg” until you see the first option that reads “Registry Editor app.” Open it by clicking on the first option.
2. Now, navigate to HKEY_LOCAL_MACHINE/SYSTEM/CurrentControlSet/Control/Session Manager/Memory Management.
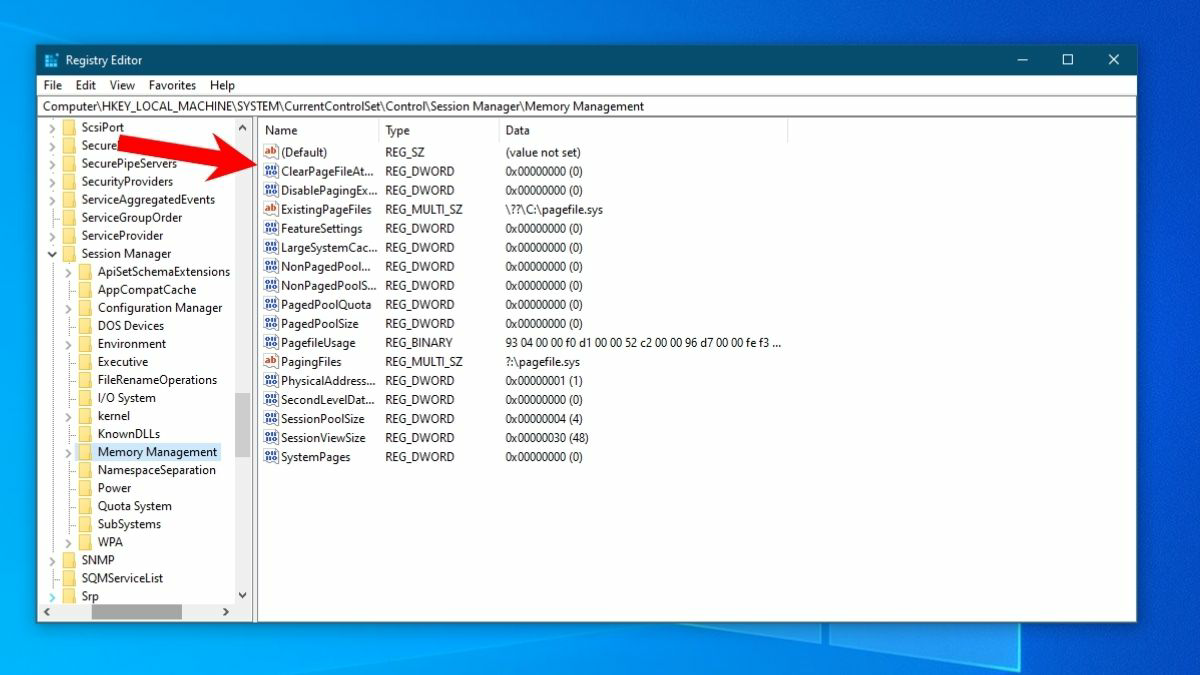
3. After navigating to the above location, find and right-click on the clearPageFileAtShutdown and click on Modify. Change the value from 0 to 1 and click on OK.

This method should, for the most part, solve the Windows 10 high RAM usage problem.
Disable The NDU Registry
For starters, NDU is a driver that helps the operating system communicate with the computer’s internal hardware. It detects new devices. For example, NDU helps the OS communicate with the USB ports to detect any connected USB devices.
Disabling the NDU registry might help because NDU will no longer be scanning for new devices all the time. This saves both computational power and system resources like memory usage. To disable NDU,
1. Open the Registry editor app again and navigate to HKEY_LOCAL_MACHINE/SYSTEM/ControlSet001/Services/Ndu.
2. Find and Right-click on the Start option and click on Modify.
3. Change the value from 2 to 4 and click on OK.

4. Now, restart your computer and check if the Windows 10 high RAM usage issue persists.
If you’re unable to use the internet after changing the NDU values, revert to the default value, i.e., 2.
Summing Up
So, these were some of the ways you can solve the Windows 10 high RAM usage issue. If you’ve tried all the methods mentioned above and the problem persists, you might need to clean install Windows 10 again.
Another way of tackling this issue is by installing and upgrading to a Solid State Drive (SSD). The problem might also be because of your slower HDD (Hard disk drive).
