


With data privacy and security being the primary concerns of everyone using the Internet, Octo Browser offers a safe solution. It is an anti-detect multi-accounting browser that comes with several benefits for crypto traders, affiliate marketers, eCommerce sites, website owners, and people working wiht bookies.
It comes with an interactive interface and the ability to handle multiple accounts with ease. Moreover, it uses real device fingerprints for authentication, which elevates the security level. Check out GoLogin if you’re seeking for an alternative to Octo Browser. GoLogin’s anti-virus browser is fairly priced and contains many additional capabilities without the small print. Examine your company’s resources and how much you’re currently spending for software.
In this review we will cover all the aspects of the browser in depth. So, without any further ado, let us dive into the details.
Installation and Registration
You need to download the latest version of Octo Browser. Click here to visit the official link. Download the installer for your OS. Now follow the steps below for Windows and Mac OS.
Windows
- Click on the downloaded installer.
- Install the browser in the recommended directory. Do not change the path/directory, as the browser needs the default folder setting for correct functioning.

- Agree with the terms and conditions and click on the Install button.
- Wait for the installer to complete the process.

- All done.
Mac OS
- Open the Octo Browser client image of .
- Drag it to the Programs and run the shortcut in the section.
- Wait for the process to complete.
- All done.
Once you have installed the tool, you need to create an account. Read all the terms and conditions before registering with the browser. Add your email, create a strong password, and create your account.
You will receive the activation link in your email. After this, you can log into your account with your credentials.
Linux
Recently it has become possible to download the beta version for Linux
Promo Code
If you have a promo code, follow the steps below to use it.

- Log in with your credentials.
- Now click on the Avatar button on the top right side of your screen. After that, click on the Billing option.

- On the next screen, click on the I have Promo Code option.

- Now add your promo code and click on the Check button.

Features of Octo Browser
Secure Profiles
A profile refers to a unique device that incorporates a collection of fingerprints that are collected from other real devices. In simple words, a profile includes all the information about the browser settings and uses it to launch the browser with those permissions.
You can create a new profile using two methods; namely, Quick Profile and Create Profile. Let us discuss them in detail.
Quick Profile
- Before using this method, select the suitable OS for your profile.

- Now, click on the Quick Profile button.

- A profile will be created with a random name, icon, and settings. You can modify these parameters according to your preference afterwards.

New Profile
If you wish to create a new profile by setting all the parameters manually according to your custom preferences, then this method will cater to all your needs.
First, you need to click on the Create Profile button.

After that, you will get several browser setting parameters that you can alter. Let us discuss everything in detail.
Basic
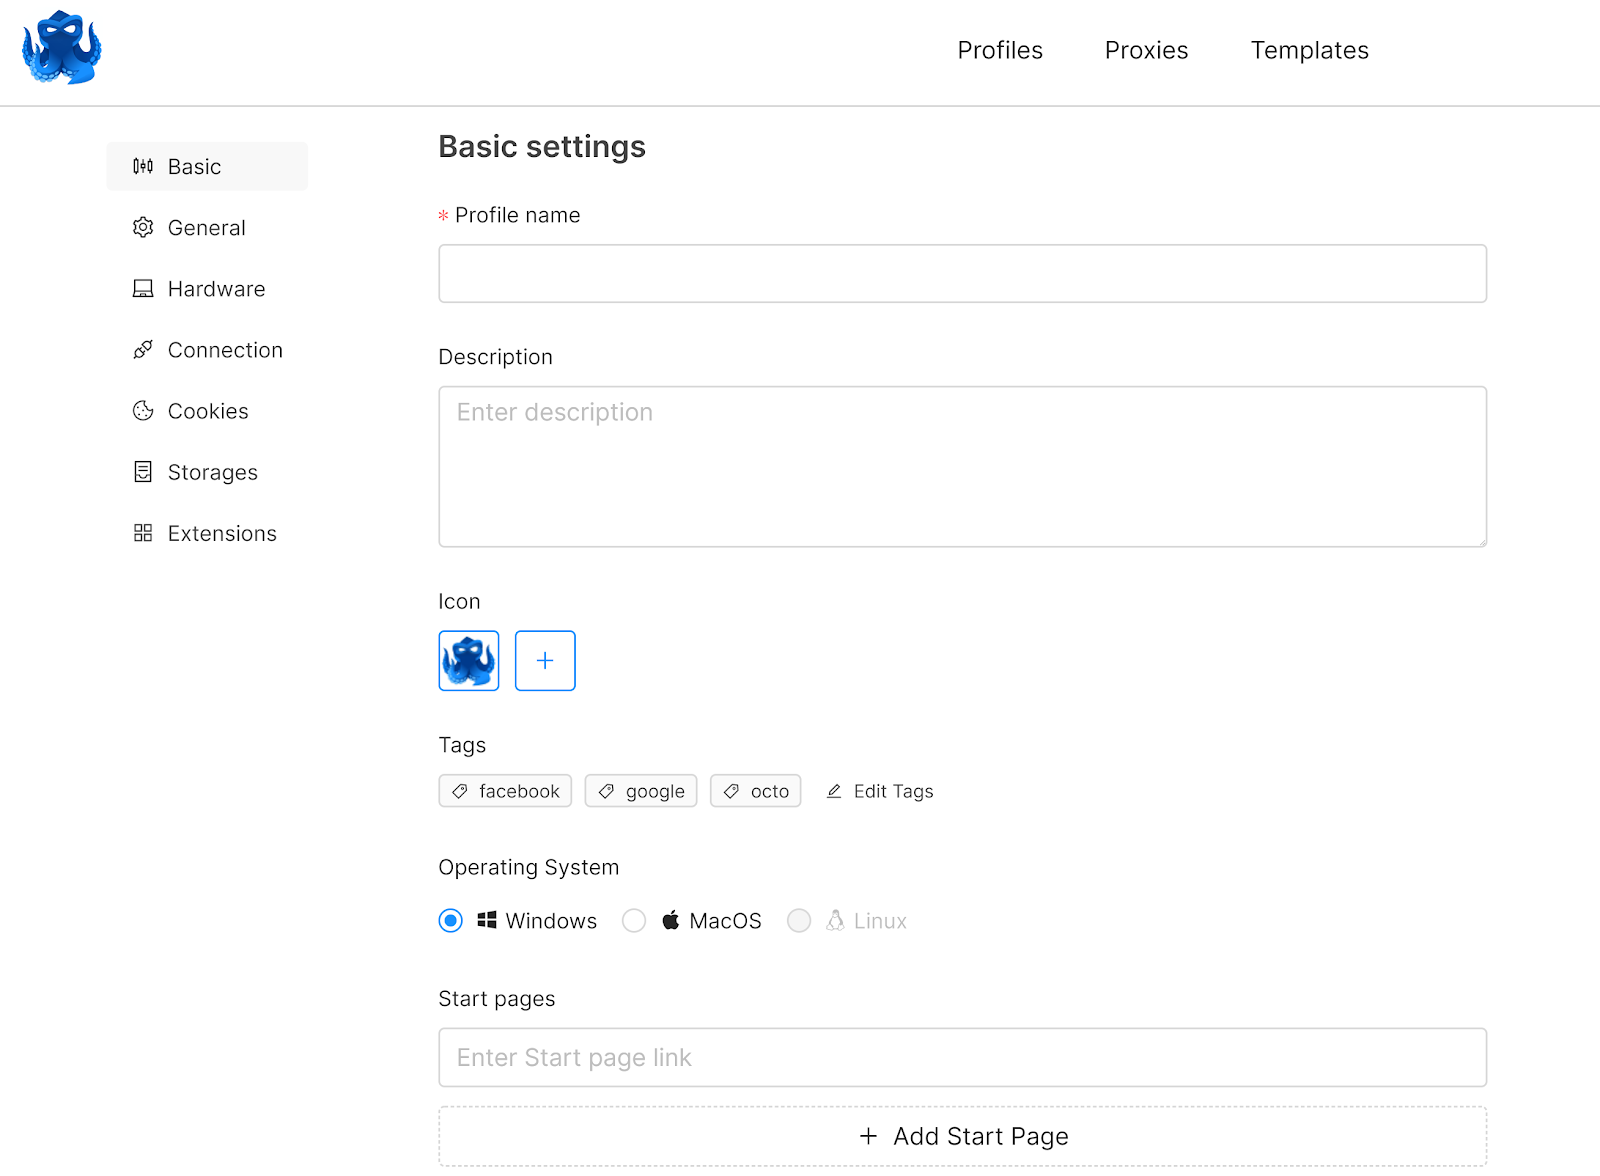
Here you can add the profile name displayed on the list. If you have any additional information, you can add it to the profile description. You can add a pre-installed icon or upload a unique one for your profile.
Besides this, you can select the OS, and the fingerprint of the profile will depend on the preferred OS. You can also assign tags to the profiles for filters. The number of tags and icons depends on the subscription plan.
General

There are several parameters here. Let us understand them in detail.
- User Agent
It acts as an application identifier for the client device. It contains all the information about the OS, browser version, and spoofed device.
- Screen Resolution
Screen resolution will set the profile window’s viewing area when you launch it. The maximum value you can set for this parameter will depend on your system resolution. This parameter does not affect the integrity of the print.
- Fonts
The selection depends on the choice of your OS. We recommend not changing the parameter unless it is vital.
- Languages
It is the substitution of profile languages of the browser. When the profile is launched in the default mode, the external IP address is checked, and languages are set according to your IP. This process works correctly in most cases. We do not recommend setting the Real value for this option.
- Timezone
The time zone is set automatically every time you launch the profile. It corresponds to the geo IP addresses, and you can change it manually. It is the substitution of the used time zone for your browser’s profile.
- Geolocation
Like Timezone and Languages, GeoLocation is also the location substitution of the browser profile. The location will be set according to the geo IP address. The parameter is randomly set with the values of latitude and longitude that correspond to the radius of a pre-defined geo.
When you visit any site that asks for your location, it will not get any data if you don’t grant permission through the browser.
Hardware

Here you can change the number of CPU cores for the profile and the RAM allocation value according to your preference.
In the Renderer field, you will get details of the video card corresponding to the fingerprint of a real user device.
The Hardware Noise refers to the software deviations that occur automatically from the system values. It is used to create a unique fingerprint of a particular browser profile.
If you wish to hide the parameters of your browser fingerprint, enable this option. If you want to blend with the crowd, disable this option. We recommend not changing the values of the parameter unless absolutely necessary, as some of the services will have a sensitive reaction to the noises.
Media devices tell about the emulation of multimedia devices connected to your device while working with a certain profile.
Connection
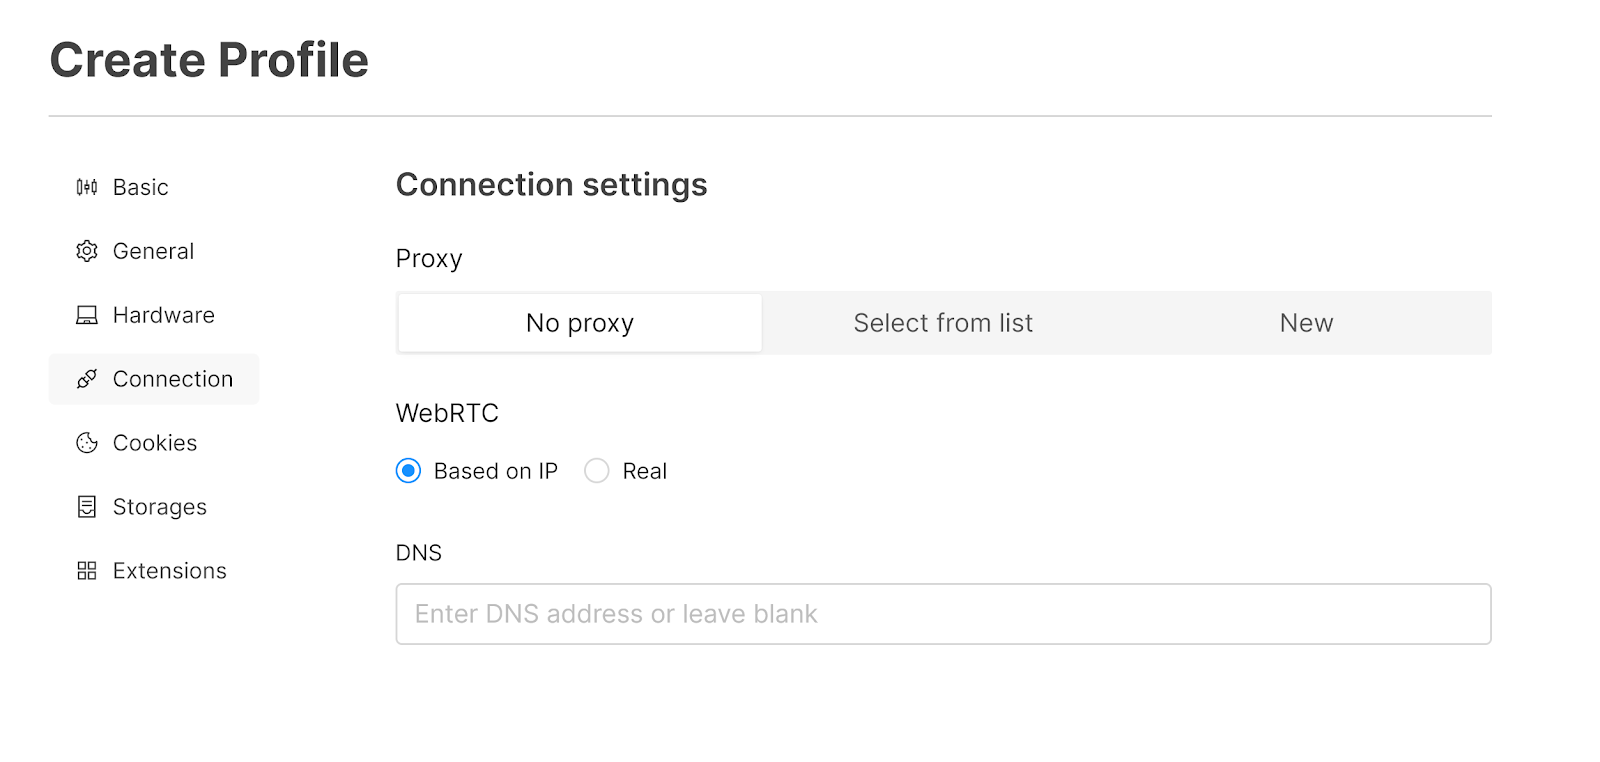
You can alter the proxy, URL, WebRTC, and DNS parameters here. You can add the proxy from the temporary proxy or proxy manager list in the proxy field.

For the quick filling of the data, you can add the proxy data in two formats given below.
- ip:port:login:password
- protocol://login:password:ip:port
Cookies
You can drag and drop files into the field to add cookies. The browser supports Netscape and JSON file formats.

Storages

In this tab there are several options that you can enable or disable according to your preference. You can modify Cookies, Passwords, Extensions, History, and Bookmarks. The Local Storage saves the indexed database data.
You can enable the Service Workers option to save data from some sites for offline work. We recommend not enabling this option as it can raise the weight and size of the profile.
Extensions

Here you can see all the extensions on the list. However, to display all extensions here, you have to enable the extension option in the Storages tab, run the profile, and install your necessary plugins.
Once all the extensions are installed, you will see them here. The list is available for all devices and team members.
Randomize
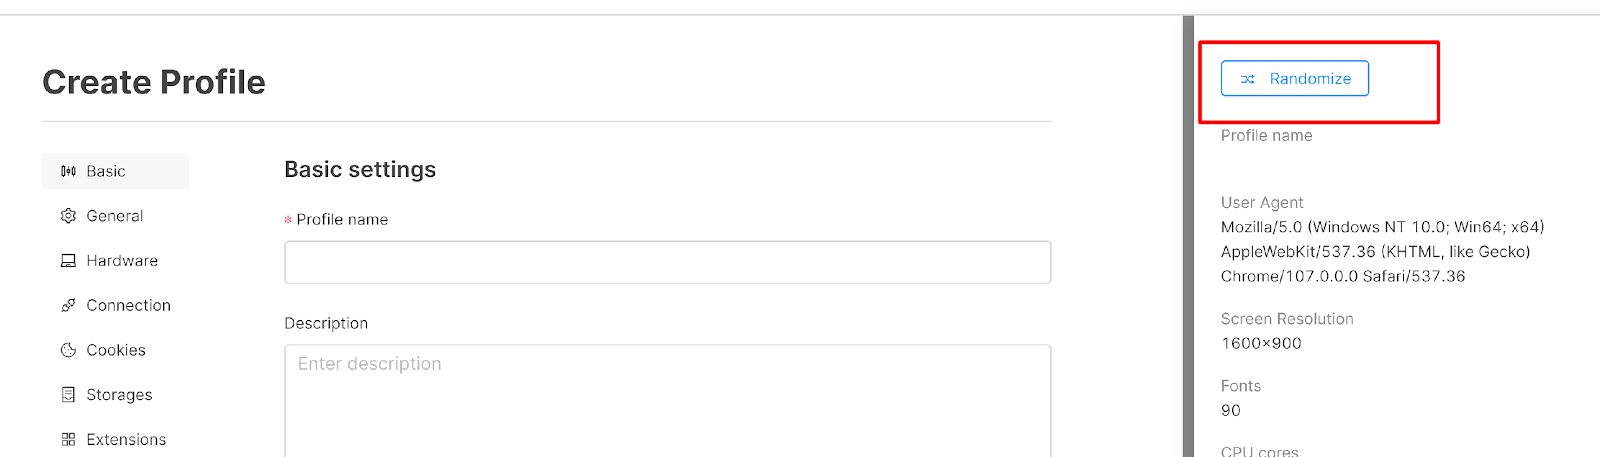
The button is available on all tabs. You can change the fingerprint of the selected profile with this option. It changes the general and hardware data, but the connection and master data stay the same.
Tags
A profile can have no tags or several tags in Octo Browser. Tags act like folders. So, a profile can exist in two or more folders simultaneously.
Creating and Assigning Tags
There are two ways to create tags and assign them.
While creating a new profile
- Here you can click on the Edit Tags option in the Basic tab.
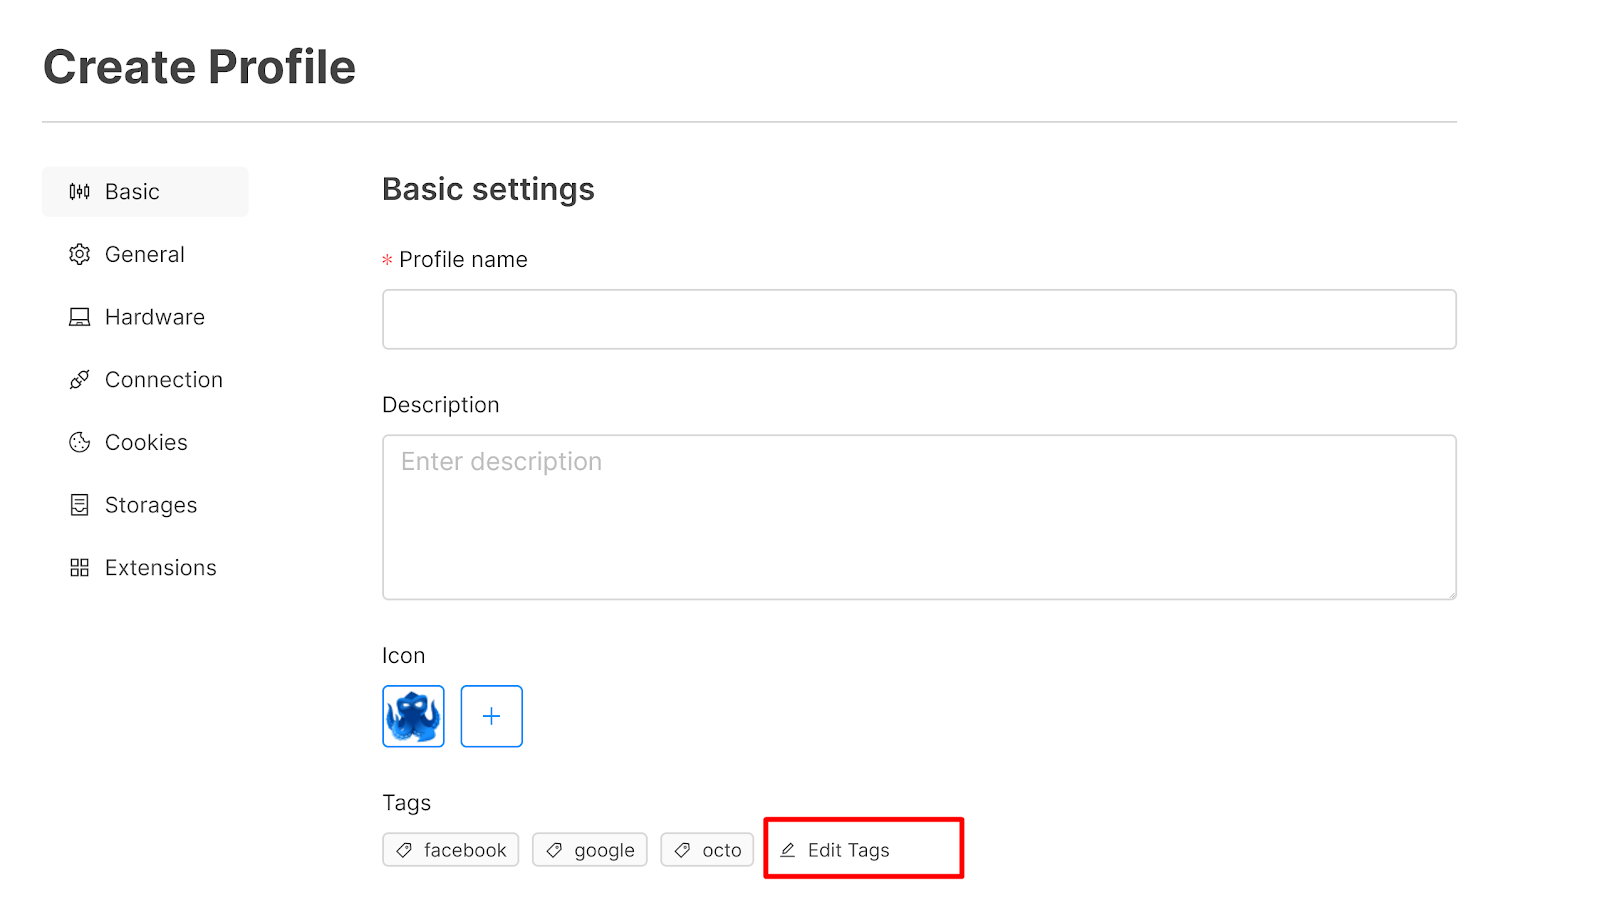
- A new prompt will appear where you can create a new tag and add it.
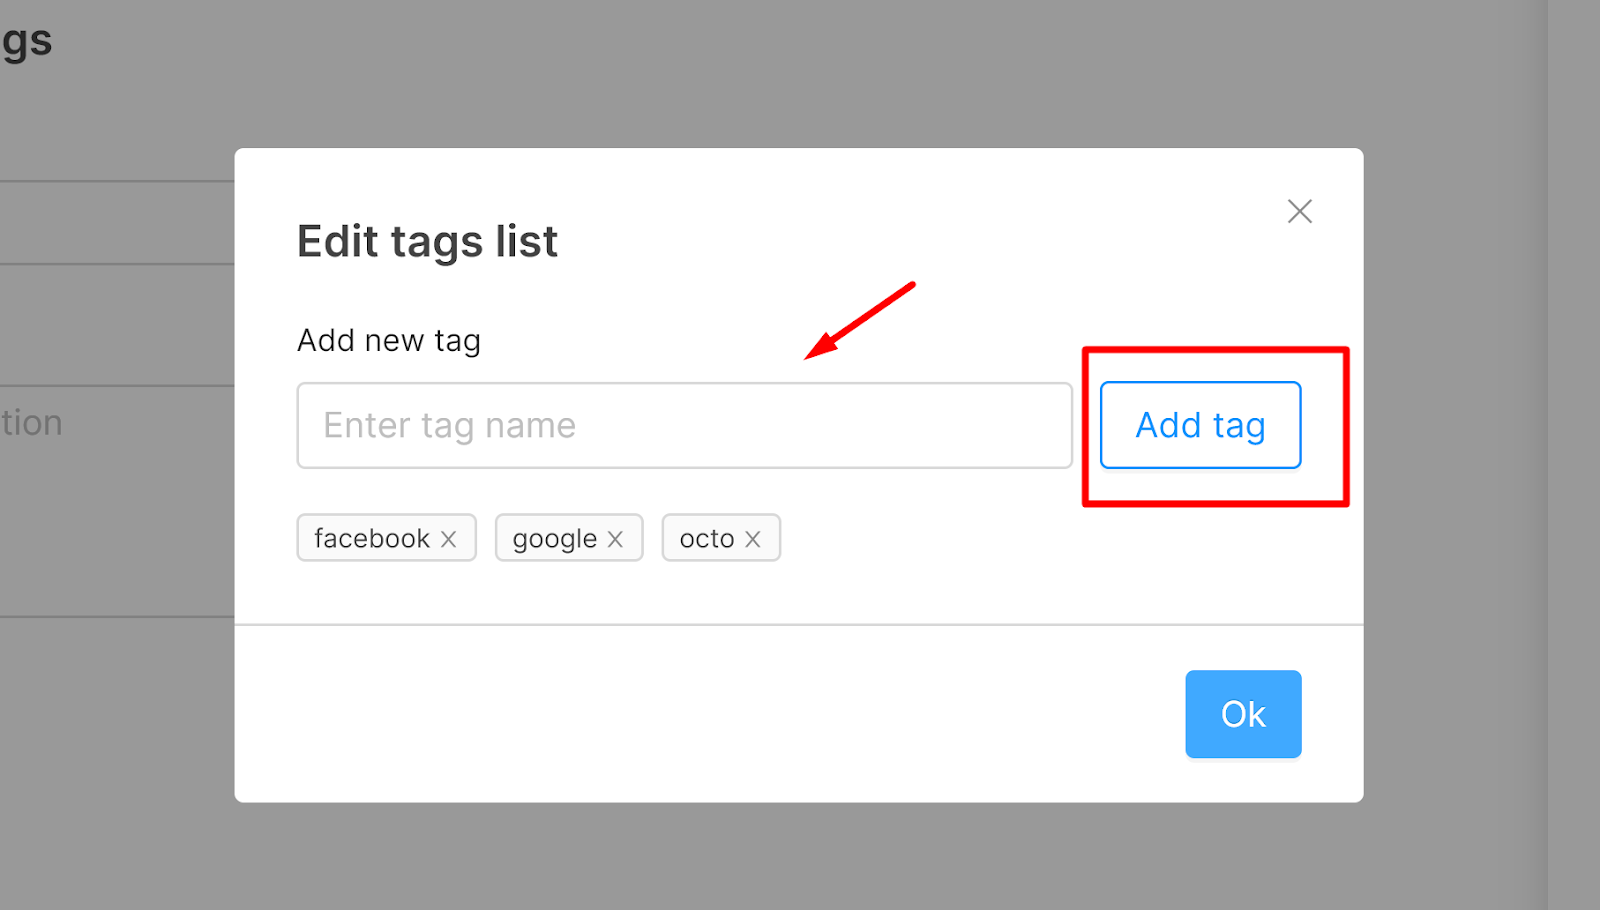
- All done.
From the main Profile dashboard
- Click on the Edit Tags option on the dashboard.
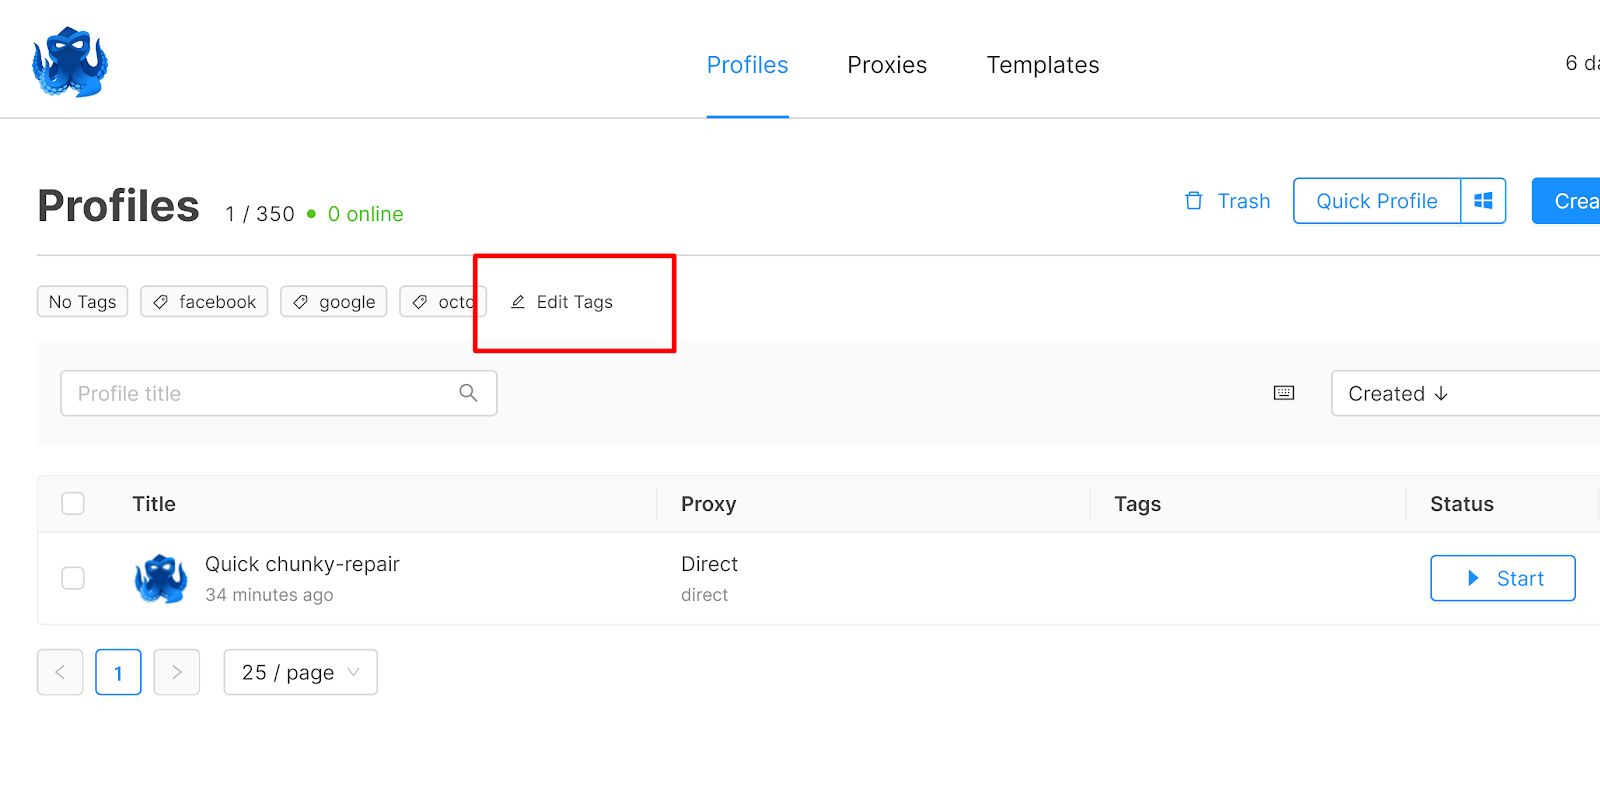
- Create any tag and add it.

- Then you can click on the profiles from the list, and then click on the tag that you want to assign to those profiles.

- All done
Removing Tags
You can remove any tag by clicking on the ‘x’ mark next to it . First, click on edit tags, and then remove any tags that you want.

Profile management
Profile editing
There are two main methods of profile editing.
Standard profile editing
Follow these steps for standard profile editing:
- First, click on the vertical ellipsis in the profiles table and press edit.

- Now, in the newly opened window, make the necessary changes. (Note: OS cannot be changed).

- Click save to apply and store the changes.

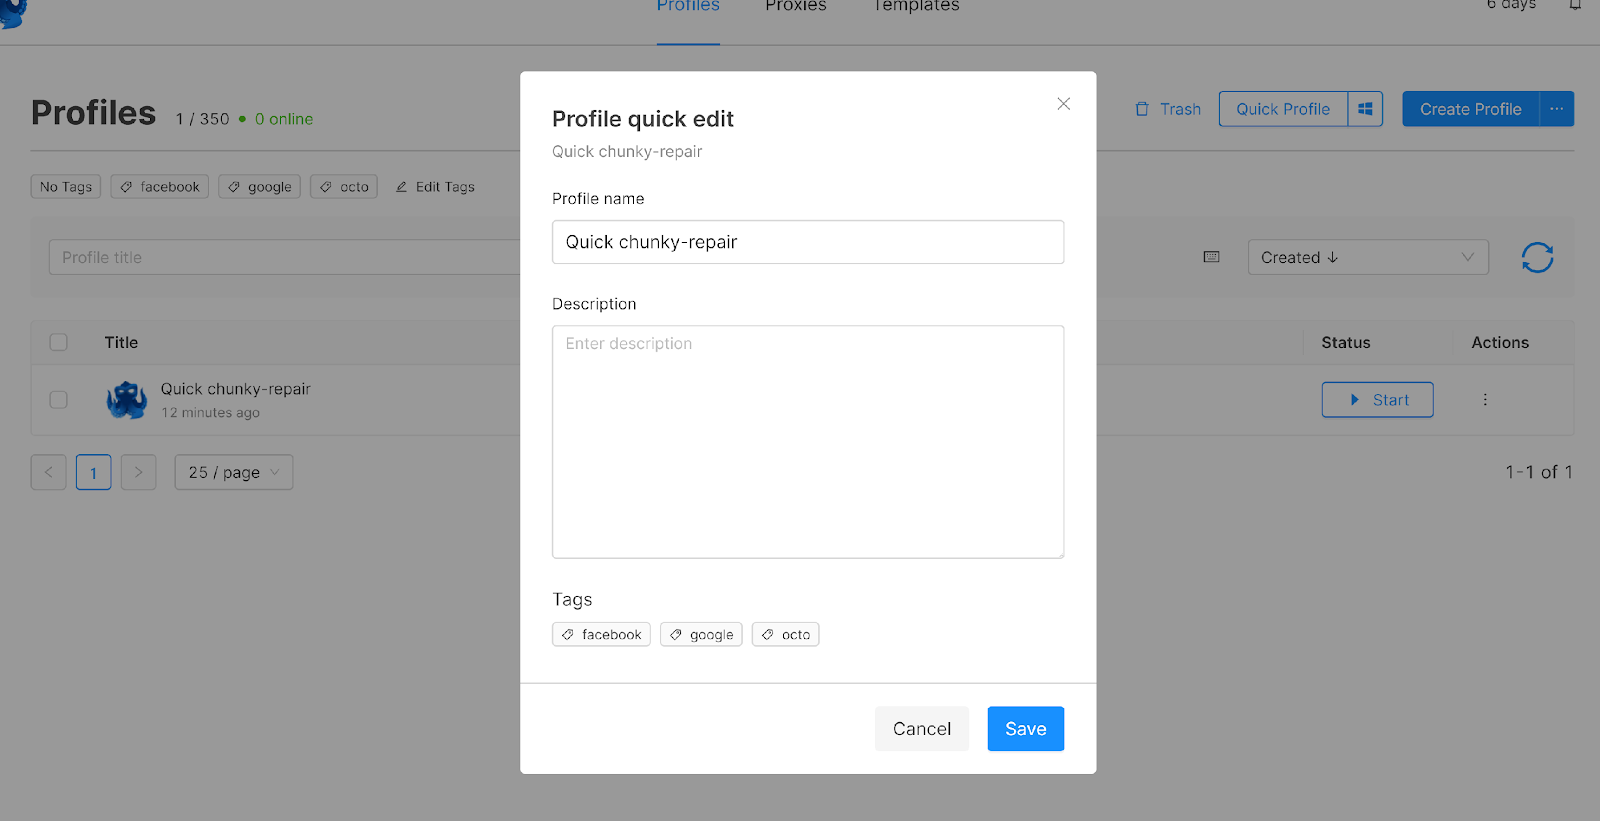
Quick Profile Edit
In this mode, you can change only basic and connection settings information. You can access it by clicking on the name of the profile.
Cloning a profile
- First, click on the vertical ellipsis of the selected profile and press clone.

- In the newly opened pop-up, indicate the desired number of clones, and then click on the Confirm button.
Transferring a profile
- First, click on the vertical ellipsis of your profile that you wish to transfer, and tap on the transfer option.
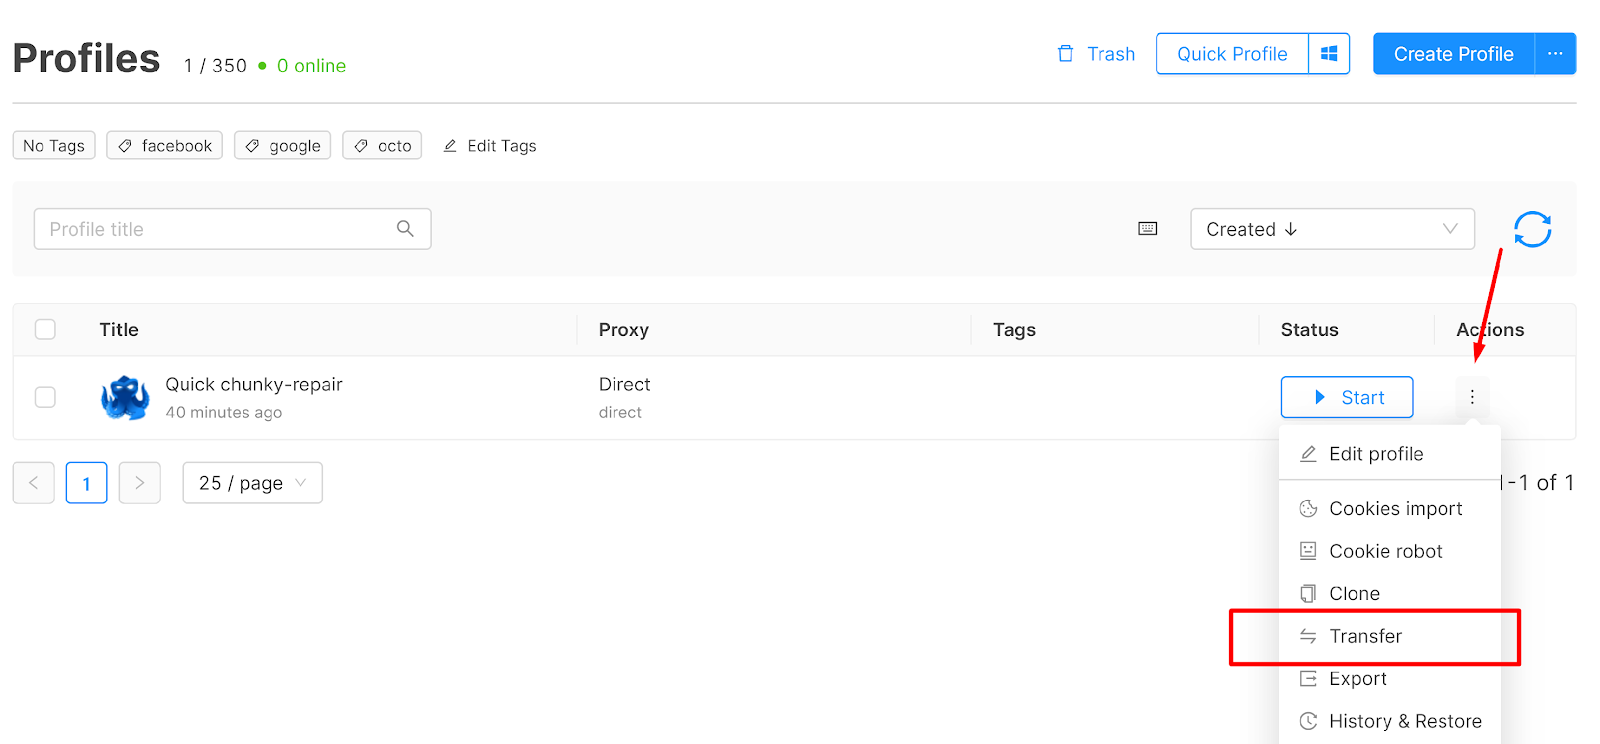
- Now, insert the Octo Browser account email id.

- In case you wish to migrate the proxy as well, choose transfer with proxy.

Accessing Profile History
- First, click on the vertical ellipsis of the selected profile and press history.

- In the new pop-up window, you’ll find the last 100 entries of the profile history.

Cookie Robot
A Cookie Robot is helpful in automating the cookie-gathering process. All you need to do is include all site URLs from which you wish to collect cookies. Once you do that, you can kickstart the automation with just one click.
Initiating Cookie Robot
- Click on the necessary profile.
- Now tap the three dots and choose Cookie Robot.

- Add all the links to different sites where you want Cookie Robot to go. Click the “Confirm” button.

- Wait for Cookie Robot to finish.
Recycle bin
The trash or recycle bin holds all deleted profiles. You can even restore them in case they get deleted by mistake. For moving profiles into the recycle bin, follow the given steps:
- Press the profile to be deleted.
- Click on the three dots and tap the ‘Move to Trash’ option.

- Tap’ move to trash’ in the confirmation prompt.
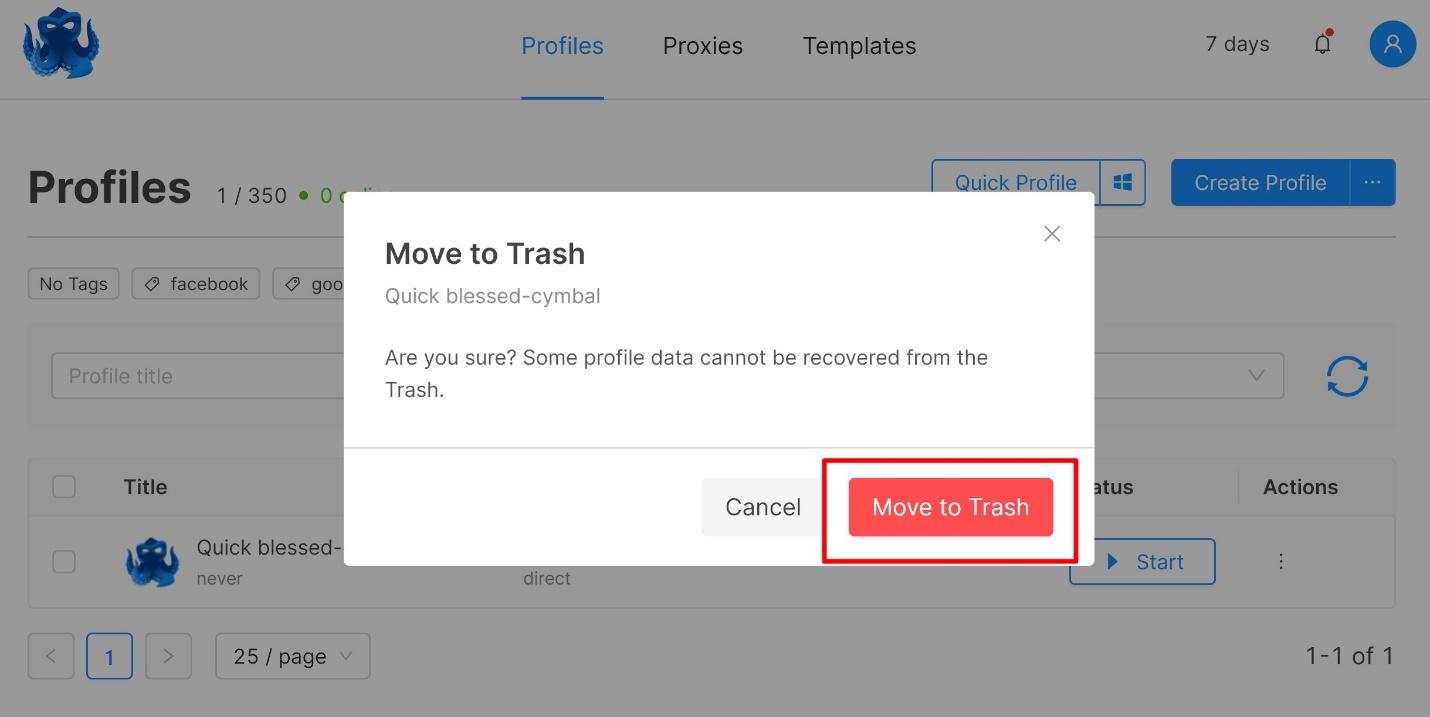
For restoring, you need to click the trash button and restore any profile you wish.

Videostream spoofing
Videostream replacement helps in substituting any camera image video with any other device video in Octo Browser.
- Start a profile and click on the video capture button beside the cookie export option.
- Now press the Spoof capture option. You can also use the Ctrl+Shift+L combination.

- Once the video gets changed, you will see that the button has turned red.

Human Typing Simulation
Imitating on manual text input is another method to reduce suspicions of antifraud systems of different online services. While managing multiple online accounts, you have to fill the fields quickly. This feature will reduce your hassle and save you time too.
With Octo Browser, you can copy the content to your clipboard and paste it in the required field by selecting the option “Type text from clipboard.” The speed of typing the text will be chosen randomly.

All about Proxy Management
The proxy manager provides you with the list of all proxies. You can add or create a new proxy by clicking the Add Proxy button.

Now fill in the necessary details and add the proxy.

You can easily assign a proxy to any team member using the proxy manager. It acts as a single base of operations to perform all the actions.
All the proxies are divided by type. The browser supports all the protocols like ssh, HTTP/HTTPS, socks5. There are also temporary proxies that you can add in the Connection settings of the profile. These temporary ones are not available in the list of the Proxy manager. However, you can save them if you want to use them in the future.
Bulk Adding

You can add many proxies together at once using this option. Click on the Bulk Add option in the Proxy Manager and add them in the following format:

You can add a prefix name to filter the list quickly. The proxies will be displayed in the format “name#number.” For example, you can add a prefix based on a country like the UK. Then all the proxies will have a title name starting with UK#1, UK#2, etc.

Templates
A template refers to profile data that can be re-used to create new profiles.
Creating and setting up
For template creation, click on the Templates tab, and tap Create Template.
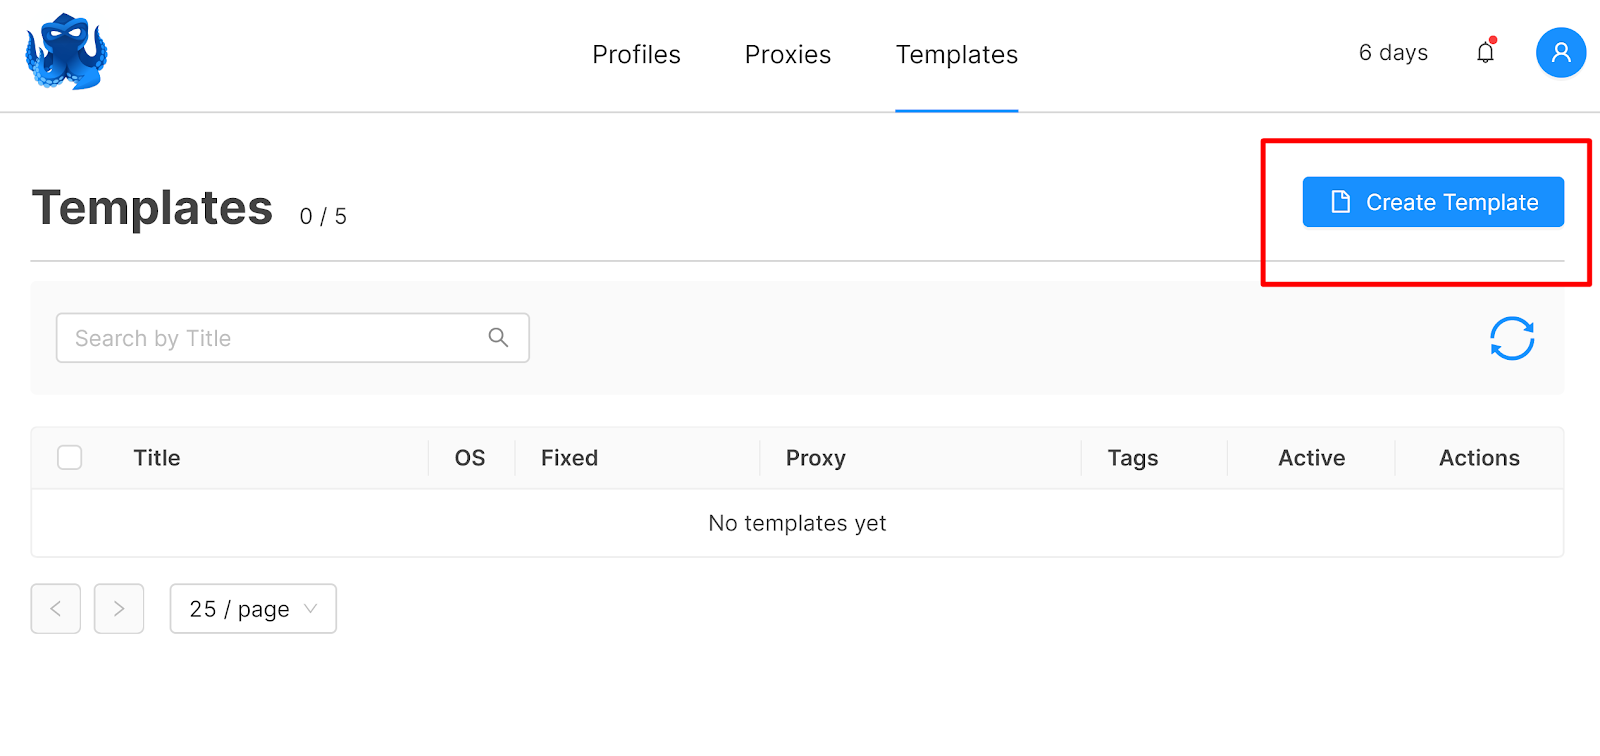
In the new window, add specific details under each section.

- Basic: Add template name, profile name, icon, OS, tags, and start page details.
- General: Add user agent (use static as default), screen resolution, fonts, language, timezone, etc.
- Hardware: Add information about the CPU cores, memory size, media devices, etc.
- Connection: List the different connection settings, such as proxy, type, DNS, etc.
- Storages: Add relevant details like cookies, passwords, history data, bookmarks, local storage, etc.
- Extension: First, install the extensions which will show in this field.
Steps to using a template
- First, enable the specific template you wish to use.

- Now, visit the main profile page.
- Once there, you can make a new profile using a template after tapping New Profile/Quick Profile, and picking a template.

- You can browse through all the information about the available templates.
Team Management
With the team management setting, you can assign access rights to all your team members. However, these settings are only available for Team, Advanced, and Custom subscription plans.
If you want to invite any person to your team, click the Invite button.

Now, add the working email address of the person. Here, you can assign profiles, proxies, and tags as well. If you get a notification “User already exists. Invite not sent,” the person already exists in your team.

You can remove a team member by pressing the trash button next to the mail.
Automation & API
You can automate interactions with your account and profiles through API. The current version allows you to create, edit, and delete proxies, tags, and profiles. Moreover, you can run a browser profile with a control library like CDP, Puppeteer, Selenium, etc.
The API option is available with the Base plan and higher. You can retrieve the API token from the browser’s client settings in the master account.

Types and pricing of subscriptions
There are five main subscription models.

- Starter
Priced at 29 tokens (eur), it enables users to create ten profiles, three tags, and one proxy.
- Base
Priced at 79 tokens (eur), it provides users with 100 profiles, ten tags, and 100 proxies, along with two profile templates.
- Team
Priced at 169 tokens (eur), this package includes 350 profiles, 30 tags, and 350 proxies, along with five profile templates, and 3 team members.
- Advanced
Priced at 329 tokens (eur), you will find 1200 profiles, 100 tags, and 1200 proxies, along with ten profile templates, and 8 team members.
- Custom
Starting at 429 tokens (eur) per month, you can opt for a custom package with advanced features.
Bottom Line

This concludes our review. We hope you now have a better understanding of all the aspects of Octo Browser. It allows you to handle multiple accounts and manage your team with ease. Moreover, you can browse your favorite sites anonymously. Its simple interface, robust security, excellent performance, and many features make it one of the best anti-detect multi-accounting browsers on the market.